How to Remove Lawn Mower Spark Plug Without Socket? Your grass trimmer will keep on working really assuming it is consistently kept up with. Taking the glimmer fitting out for assessment is an ordinary procedure. A blaze fitting is key for starting and working your lawnmower precisely. It ignites the fuel-air mix in the engine.
Without a connection, how should I kill the glimmer fitting from my lawnmower? This expansive handbook deals with you. Let’s read below about “How to Remove Lawn Mower Spark Plug Without Socket?”
Table of Contents
Tools and Materials Needed:
We need to gather the necessary equipment and supplies in general before we can begin the evacuation. We will not need a standard connection wrench to complete the work, yet there is some additional stuff we’ll require. Here are the essential things:
A mobile wrench, streak fitting boot pliers, long nose forceps, with an optional extension and clasp
What You Truly need to Know Preceding Trying to Wipe out the Blaze Fitting from Your Grass Shaper Without a Connection
How to Remove Lawn Mower Spark Plug Without Socket
Step 1: Ensure Safety First
Center around your security before attempting to fix your grass shaper. To ensure your safety, unplug the spark plug wire before starting the engine. Doing so will discard any normal gamble while you work on the blaze connection.
Step 2: Locate the Spark Plug
The region of the glimmer connection on the shaper’s engine could vary starting with one model then onto the next and creator to maker. A rain boot or a wire will be attached to it. Stop what you’re doing and go get the glimmer connection.
Step 3: Remove the Spark Plug Boot
Utilize long nose forceps or glimmer fitting boot pliers to carefully hold the blaze connection’s boot, which is its flexible or plastic covering. It can be removed from the flash fitting by pulling on the boot with care. Despite how minor, you ought to at first mood killer the blaze connection before you could dispose of it.
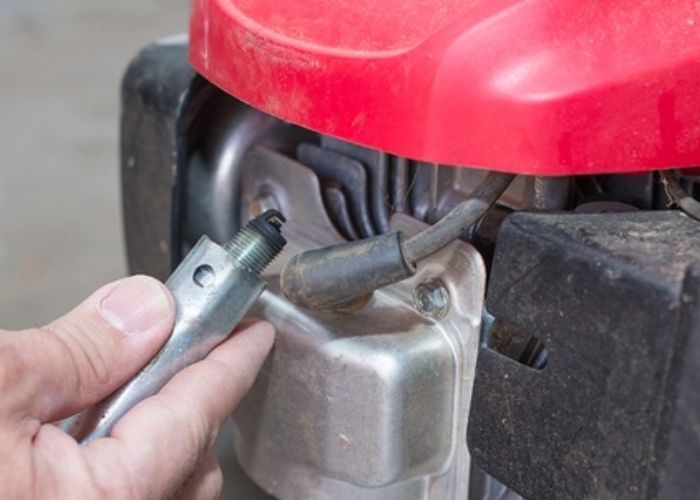
Step 4: Choose the Right Wrench
Pick the Right Tool: On the off chance that you can’t go after an attachment wrench, a customizable wrench will get the job done. An adaptable wrench that can solidly fit around streak connection bases that are square or hexagonal is required. Be sure the wrench is gone to the right size preceding procedure.
Step 5: Loosen the Spark Plug
At the point when you’ve changed the wrench, crease it over the groundwork of the blaze fitting. To unscrew the glimmer fittings, turn the wrench anticlockwise. Consumption, soil, or other garbage can at first reason a few tight curves. To thwart streak connection hurt, stay aware of positively twisting the wrench.
Step 6: Use a Ratchet and Extension (Optional)
In case the glimmer fitting is particularly recessed or by and large difficult to reach, you could find it less difficult to use a wrench and development to do the task. Ensure the expansion is associated with the right-sized attachment prior to putting it over the flash fitting. The glimmer connection can be loosen by turning the wrench anticlockwise. By giving extra influence, this technique essentially improves on the method involved with eliminating unshakable flash fittings.
Step 7: Inspect the Spark Plug
Once free, carefully take out the blaze fitting from the engine by unscrewing it. Meanwhile, guarantee the glimmer fitting is freed from damage, wear, or fouling. Dependent upon the reality of the wear or how much stores, replacing the blaze attachment could be anticipated.
Step 8: Clean the Spark Plug (Optional)
Cleaning the Flash Fitting (Optional) If the flash fitting is in good condition, you can use a wire brush to get the flash fitting clean.
Step 9: Reinstall the Spark Plug
Secure the blaze connection by hand-hanging it back into the opening. The movable wrench can be used to keep more of it safe and comfortable. Be watchful not to overtighten to shield the engine strings’ condition.
Step 10: Reattach the Spark Plug Boot
Press the flash fitting boot onto the attachment until it fits properly once you have effectively reinstalled it. Then, reattach it. This ensures a strong electrical affiliation.
Step 11: Reconnect the Spark Plug Wire
Finally, reconnect the glimmer fitting wire to the fitting. Applying hard strain will give a safeguarded affiliation.
Conclusion:
Even without an attachment, you can remove the flash fitting from a lawnmower if you follow these steps and have the right tools. Keeping your lawnmower moving along as expected requires customary support, which incorporates checking and changing the flash fittings. If you follow the steps below, you won’t even need a socket wrench to remove a spark plug.
Continuously place security first, ensure you have the right devices, and check the flash fitting for wear or harm as you work. I hope you like reading “How to Remove Lawn Mower Spark Plug Without Socket?”

Barry, the expert behind LawnInspection.com, holds a Master’s degree in Horticulture and brings over 20+ years of hands-on experience in landscaping and lawn care. With certifications in sustainable lawn management, Barry is dedicated to providing readers with authoritative insights and practical tips for maintaining lush, healthy lawns. His extensive knowledge and commitment to excellence ensure that every piece of advice on LawnInspection.com helps transform your lawn into a green oasis with proven, eco-friendly practices. Connect with Barry on social media: Instagram and Facebook.